Whether you are starting a new job or joining a new project, getting oriented in a new iOS codebase can be difficult and overwhelming. It is particularly hard if the codebase is very large, and especially challenging if you are early in your career and do not yet have much experience to draw from.
Where do you even begin? How do you know where to look? You’re probably familiar enough to know there’s going to be an AppDelegate somewhere and a bunch of view controllers, but after running the app how do you find out which view controllers correspond to which screens?
You will probably be assigned some starter tasks, small bugs to help you ramp up. Perhaps you have a mentor that can help guide you. While you should definitely ask questions early and often, it is also beneficial to try to discover some things on your own. By trying to figure out where you need to make changes on your own, you’ll learn more, you’ll get oriented in the project more quickly, and you’ll be able to ask better questions to your team.
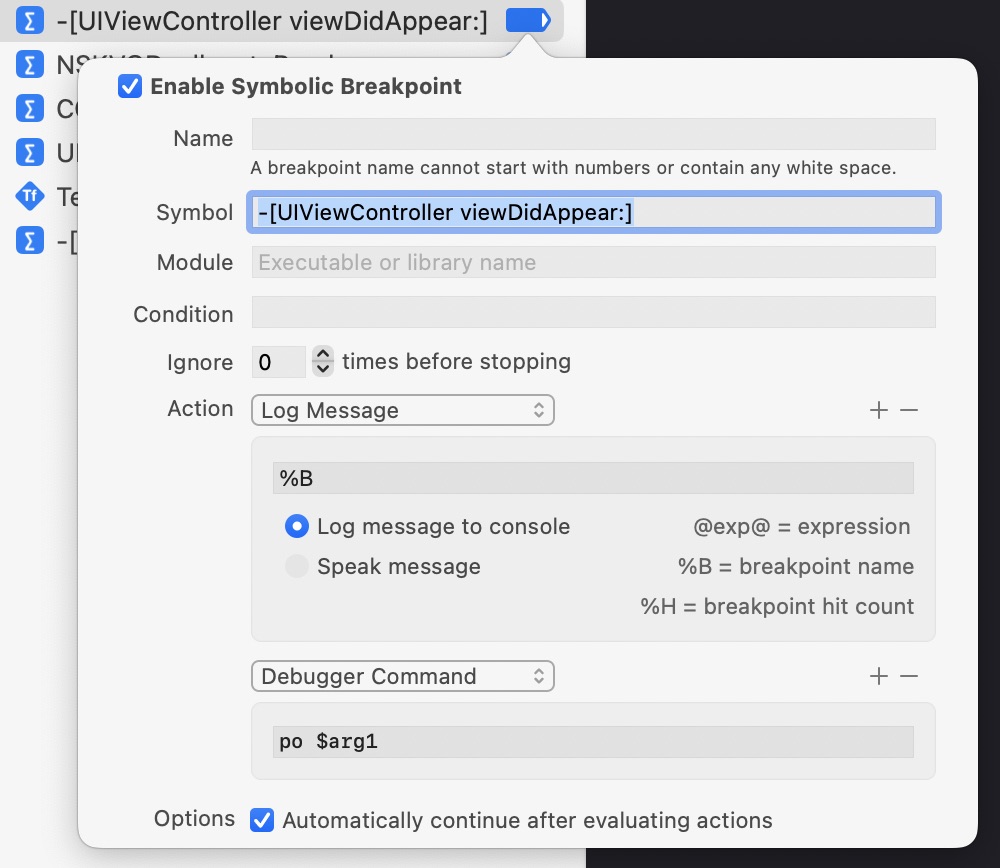
A great way to get started in an iOS codebase is by setting a symbolic breakpoint in -[UIViewController viewDidAppear:]. This is very similar to the breakpoint I previously wrote about. You’ll need to configure the breakpoint with a “Log Message” action with %B to print the breakpoint name, and a “Debugger Command” action with po $arg1 which will print the instance of the view controller. Finally, tell the debugger to continue after evaluating the actions. I also recommend filtering the debugger out when you build and run.

Xcode breakpoint for viewDidAppear
Enable the breakpoint and run the app. As you navigate to new screens, you’ll see log messages in the console like the following:
-[UIViewController viewDidAppear:]
<LaunchScreenViewController: 0x7fc2a8974ba0>

-[UIViewController viewDidAppear:]
<TimelineViewController: 0x7fc2a884c650>

-[UIViewController viewDidAppear:]
<ProfileViewController: 0x7fc2a90c5600>
Each time a new view appears, you’ll see the name of the corresponding view controller class name! Then you can simply search Xcode for that view controller class and find where you need to make edits. If you are still stuck, don’t worry. You can ask your team for help, but this time you’ll already know roughly where you need to make changes. Also, I recommend that you share this breakpoint to reuse it in other projects.
Note: unfortunately, I’m not sure what the equivalent strategy would be for this in SwiftUI, if there is one at all. If you have ideas, please let me know and I’ll update this post!
Finally, if you want to explore even further, you should try using FLEX and Chisel.